
Session 21 — Build & Share Your Site
Duration: 60 min · Format: live online
What you'll learn: by the end, you will have built a fun multi-section web page about yourself or a topic you love — using everything you learned about HTML and CSS — and presented it to the class.
Soft skill focus — Confidence & presenting
Today you'll also grow Confidence & presenting. You'll share your finished website with the class and say a sentence about what you built.
Try this: when it's your turn, keep it simple — show your page and say one sentence about it. Then enjoy the applause; presenting is easier every time you do it.
Think about: What was one part of your website you were most proud to present?
What you'll need
- Open CodePen and start a new Pen. The starter template below is ready to paste if you want a fast start.
- Your Session 20 homework plan (three sections + colours), open beside you.
- To share your page: in CodePen, Save the Pen, then use Share → Copy Link so you can send or present it.
Hook
Think about these questions:
- Three sessions ago, you hadn't made a website. Today you finish a real one — how does that feel?
- Your page can be about anything — you, your pet, space, football, a game. What will yours be about?
Here's the big idea: today you'll build a multi-section page and show it to the whole class.
Teach — Plan the page + starter template
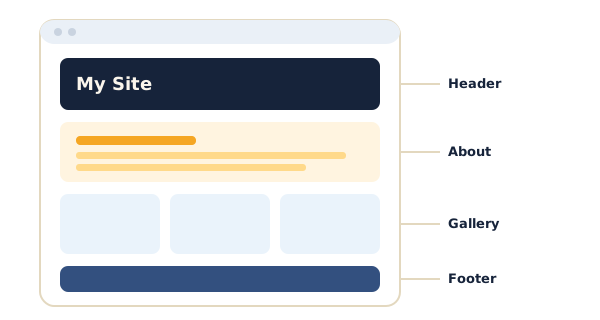
A good page is organised into sections, each with its own heading. Picture the plan: a title at the top, then three sections (like "About Me," "My Favourites," "My Goals"), then some style to tie it together.
Use this diagram to picture the page structure — a web page built from stacked sections: header, about, gallery, footer.
Type this in CodePen — the HTML box (this is the starter template):
<h1>All About Me</h1>

<h2>About Me</h2>
<p>My name is Sara and I am 10 years old.</p>

<h2>My Favourites</h2>
<p>I love drawing, mango juice, and rainy days.</p>

<img src="https://picsum.photos/300/200" alt="A photo I like">

<h2>My Goals</h2>
<p>One day I want to build my own video game.</p>
⚠ Watch for: copying the example word-for-word instead of making it yours. Change every line to be about you or your topic.
Quick question: what are your three section headings going to be?
Teach — Sections and finishing touches
Now bring in CSS to make it look finished. Here's a simple style block that works for any page.
Type this in CodePen — the CSS box:
body {
  background-color: lightyellow;
  font-family: Arial;
  text-align: center;
  padding: 20px;
}
h1 {
  color: teal;
}
h2 {
  color: darkorange;
  margin-top: 20px;
}
p {
  color: darkslategray;
}
Notice how each selector matches a part of the page. Change the colours to your own favourites.
⚠ Watch for: a broken page after a copy-paste — usually a missing
}or;. If the style suddenly stops working, look at the line just above where it broke.
Quick question: which colour will you change first to make it yours?
Activity — Build your site
Build & share your site (≈25 min). This is the unit's build project — you build your own multi-section page in a Pen. Your finished page must include:
- One
<h1>title. - Three sections, each with an
<h2>heading and at least one<p>. - One
<img>with a real image link. - CSS styling — at least a background colour, a heading colour, and some spacing.
- One
<a>link to a website you like (bonus: a "find out more" link in one section).
With 5 minutes left, Save your Pen and copy the share link, ready to present.
Remember: you planned it, built it, and styled it — that's exactly how real websites are made.
Check yourself + share and present
Share your screen or link and say one sentence about your page. Then check what you learned — answers are after the arrow.
- Point to your
<h1>— what makes it different from your<h2>sections? →<h1>is the main title (biggest);<h2>marks each section below it. - Show one thing your CSS changed. → Any correct example — a background colour, heading colour, font, or spacing.
- Which part of your code is the picture, and what does its
srchold? → The<img>tag;srcholds the web address of the picture.
Wrap-up
- Give yourself a round of applause — you built a real website from scratch.
- Try this at home — Keep Building: add one new thing to your page — a bullet list, a new section, a fun colour, or another picture. Show a family member your website and explain what HTML and CSS each do.
Tips & extra challenges
- Watch out: it's easy to think "a finished website has to be huge and perfect." Actually, a great first site is clear, organised, and personal — three tidy sections beat twenty messy ones.
- Want more? Try this: wrap each section in a styled "card." Add a
classto a section's heading and paragraph and style a boxed look:
.card {
  background-color: white;
  padding: 15px;
  margin: 15px;
  border: 2px solid teal;
}
Then see if you can explain how padding, margin, and border work together to make the card. Another idea: add a second image or a bullet list with <ul> and <li>.
Vocabulary
| Term | Meaning |
|---|---|
| Section | A part of the page with its own heading |
| Template | A ready-made starting page you fill in |
<h2> |
A section heading, smaller than the main title |
| Style block | The set of CSS rules that decorate the page |
| Save | Storing your Pen so it gets a shareable link |
| Share link | The web address others can open to see your page |
Resources
- CodePen — build, save, and share your finished page (main tool).
- Lorem Picsum — free placeholder photos for your sections.
- MDN — Learn web development — where curious students go next.
- W3Schools — Try it Editor — another sandbox to keep practising at home.
Practice set
Practise on your own. Answers are after the arrow.
- What two languages did you combine to build your site, and what does each do? → HTML (what's on the page) and CSS (how it looks).
- Write the HTML for a new section heading that says "My Hobbies." →
<h2>My Hobbies</h2> - You want each
<h2>section heading to be purple. Write the CSS. →h2 { color: purple; } - Your page looks squashed against the edges. Which CSS property adds breathing room, and where would you put it? →
paddingon thebody, e.g.body { padding: 20px; }. - After a copy-paste, all your CSS stopped working. What's the most likely cause? → A missing
}or;— check the line just above where the styling broke. - Name the five things your finished page should have. → An
<h1>title, three<h2>+<p>sections, an<img>, CSS styling, and a link<a>.
Going deeper (optional)
- Give the page a navigation menu. Links can jump to sections on the same page. Add an
idto a heading (<h2 id="fav">My Favourites</h2>) and a link that jumps to it (<a href="#fav">Jump to Favourites</a>). Test the jump. Real websites use links like these for menus. - Publish for real. CodePen already gives every saved Pen a web address you can send to family. Look for the Share → Copy Link button. Grown-up developers use tools like this to put pages on the internet so anyone in the world can visit — a nice bridge to what comes next in your learning.
Common mistakes & fixes
If it's not working, check these common mix-ups:
- Mistake: keeping the example text (name "Sara," etc.) instead of personalising. → Fix: change every line to be about you; the template is only a starting shape.
- Mistake: all three sections run together with no headings. → Fix: start each section with its own
<h2>so the page is clearly organised. - Mistake: the whole page loses its style after a paste. → Fix: hunt for a missing
}or;on the line just above where styling stopped. - Mistake: the image link is broken or has no quotes. → Fix: use a real link inside quotes, e.g.
<img src="https://picsum.photos/300/200" alt="...">. - Mistake: forgetting to Save before presenting, so the share link is empty. → Fix: click Save first, then Share → Copy Link.
What's next
This is the final session of Course 1's learning units — you're ready for the Projects & Assessment section.