
Session 18 — Design & Showcase Your Game
Duration: 60 min · Format: live online
What you'll learn: by the end, you will have planned, built, playtested, and presented your own small Scratch game using everything from this unit.
Soft skill focus — Confidence & presenting
Today you'll also grow Confidence & presenting. In the showcase, you stand up as the designer of your own game and explain it to the class.
Try this: when it's your turn, use a simple 30-second frame so you know exactly what to say — name the goal, show it being played, and name one thing you'd add next. Then enjoy the applause!
Think about: What was one thing you felt proud to show the class about your game?
What you'll need
- Open Scratch and click Create — or remix your catch game from Sessions 16–17.
- A shape to aim for: a tiny "dodge the falling rocks" game — arrow keys to move, score for surviving, lose a life on a hit, "Game Over" at zero lives.
- A spot to jot a simple one-line game plan (goal, controls, win, lose).
Hook
Think about these questions:
- If you could invent any game, what would the player try to do — catch, dodge, race, collect?
- What would make someone say "one more go!" after they play it?
- Today you are the game designer. What's the first thing a designer should do — start coding, or make a plan?
Here's the big idea: today you design and build your own game from start to finish — plan it, build it, test it, and show it off.
Teach — Plan before you build
Great game-makers plan first so they don't get lost. A small game needs just four things. Write this frame down and fill it in for your idea:
- Goal — what is the player trying to do? (Catch 10 apples. / Dodge the rocks for 30 seconds.)
- Controls — which keys make things happen? (Arrow keys move; space to jump.)
- Win — what makes the player win? (Score reaches 10.)
- Lose — what makes the player lose? (Lives reach 0.)
Once you have your one-line plan, notice how each part maps to blocks you already know:
- Goal + controls → sprites and key-press events (Session 15).
- Keeping score, keeping it running, messages → variables, forever loops, broadcasts (Session 16).
- Win and lose → if/then and touching (Session 17).
⚠ Watch for over-scoping: it's tempting to plan a giant game with ten levels and bosses. Aim for one simple, finished game instead. A small game that works beats a big game that's broken. Cap it at one screen, one goal, one win, one lose.
Quick question: in one sentence, what is your game's goal? Say it out loud before you open any blocks.
Teach — Build, then playtest
After building, real designers playtest — they let someone play and watch what happens without helping. As you build, keep asking:
- Can the player tell what to do without being told? If not, add a
say [Use arrow keys!]at the start. - Is it too easy or too hard? Change the speed or the number of lives.
- Does anything break? Score not counting, sprite stuck, message not showing — fix the biggest bug first.
Here's a simple playtest routine to use with a partner:
- Your partner plays for one minute; you just watch (no helping).
- Ask: "What did you think you were supposed to do?"
- Write down one thing to fix and fix it.
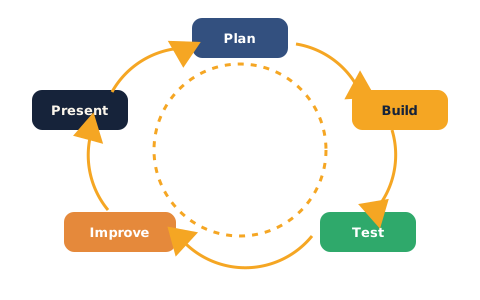
Key idea: plan → build → playtest → improve. A game is never "done" on the first try — testing makes it better.
Your game moves through a cycle: plan, build, test, improve, present — the make-a-game cycle.
Try it: why should you stay quiet while a partner playtests? (Answer: to find out if the game explains itself; if you have to explain it, players in real life won't get it.)
Activity — Build your game
This is the unit's build project — you design and build your own small game. Make it your idea.
Your checklist:
- Plan (2 min): write your goal, controls, win, and lose in one or two lines.
- Sprites & stage (5 min): pick a player sprite, at least one other sprite (target or enemy), and a backdrop.
- Controls (5 min): move the player with key-press events.
- Score & loop (5 min): add a Score variable and a forever loop that keeps the action going.
- Win & lose (5 min): add if/then with touching for scoring and for losing; add a win and a lose message with broadcasts.
- Polish (3 min): a start message telling the player what to do, a sound, and tuned difficulty.
If you're stuck, try:
- Can't choose an idea? Pick one of three quick templates: catch (collect falling things), dodge (avoid falling things), maze (reach the goal without touching walls).
- A sprite that won't move usually needs a
when [key] pressedblock. - No win or lose yet? A "game" needs a way to end — add one if/then.
- Planned too big? Get one level fully working first, then add more if there's time.
Aim to reach a playable state and do at least one partner playtest before the showcase.
Showcase + check yourself
Share your game! Give a 30-second demo: name the goal, show it being played, and name one thing you'd add next.
Then check what you learned — answers are after the arrow.
- What four things did you decide in your game plan? → Goal, controls, win, lose.
- Which blocks did you use to make the player win or lose? → If/then with touching (and a score/lives check), plus a broadcast to show the win/lose message.
- What is playtesting, and why does it help? → Letting someone play while you watch; it shows what's confusing or too hard so you can fix it.
Wrap-up
- Finish this sentence: "The best part of designing my own game was…"
- Try this at home — Share & Polish: show your game to one person at home, watch them play, and add one improvement based on what you saw. If you like, click Share in Scratch to publish it. Bring your finished game to Session 19.
Tips & extra challenges
- Watch out: it's easy to think "a bigger game is a better game." Actually, a small, finished, fun game is a real success — professionals ship small and add later. Anything playable is something to celebrate.
- Want more? Try this: add a second level (switch backdrop and speed up when the score hits a target), a high-score variable that remembers your best run, or a title screen sprite that says the game's name and waits for a key to start. Challenge: add a sound track with a
forever→play sound … until doneloop on the stage.
Vocabulary
| Term | Meaning |
|---|---|
| Game design | Planning what a game does before building it |
| Playtest | Watching someone play to find what to fix |
| Win / lose condition | The rule that ends the game |
| Polish | Small extras (sounds, messages) that make a game feel finished |
| Remix | Making your own version of someone else's Scratch project |
Resources
- Scratch — free, in your browser, no install (main tool).
- Scratch Ideas page — starter guides for catch, dodge, and maze games.
- Scratch Starter Cards — printable one-page project ideas.
- Scratch: How to Share a Project — steps to publish a game safely.
Practice set
Practise on your own. Answers are after the arrow.
- Write a one-line plan for a game: goal, controls, win, lose. → Any clear plan, e.g. "Catch 10 stars with arrow keys; win at 10; lose if you miss 3."
- Add a start message that tells the player what to do. → On the player sprite:
when green flag clicked→say [Use arrow keys to move!] for 2 seconds. - Make your game end with a clear win screen. →
if <Score = 10> then broadcast [you win]→stop [all]; a sprite says "You Win!" on receive. - Change one thing to make your game a little harder, then test it. → e.g. increase falling speed, reduce lives, or raise the score needed to win; play it to check.
- Playtest with a partner and write down one thing to improve. → Partner plays for a minute while you watch; note one confusing or too-hard part.
- Add one polish item: a sound, a background, or a second sprite. → Any of:
play soundon an event, a chosen backdrop, or an extra sprite with its own behaviour.
Going deeper (optional)
- Give feedback that helps. Use a tiny review frame during the showcase: "One thing I liked… one thing I'd add…" after each demo. Kind, specific feedback is a real designer skill and keeps the showcase positive.
- Remix and credit. In Scratch you can remix someone's project to learn from it, and the original maker is always credited. If you published your game, look for where the "remix tree" appears. This is how sharing and giving credit works in a maker community.
Common mistakes & fixes
If it's not working, check these common mix-ups:
- Mistake: planning a huge game and running out of time with nothing playable. → Fix: cap it — one screen, one goal, one win, one lose; add extras only if time remains.
- Mistake: no way to win or lose, so the "game" just moves forever. → Fix: add at least one
if/thenthat ends the game with a broadcast andstop all. - Mistake: the player can't tell what to do. → Fix: add a
sayblock at the start with the controls and the goal. - Mistake: forgetting to reset Score and Lives on the green flag, so old numbers carry into the new game. → Fix: start every play with
set [Score] to 0andset [Lives] to 3. - Mistake: skipping playtesting and assuming it's fine. → Fix: always let a partner play while you watch silently — the bugs and confusing bits show up fast.
What's next
Session 19 — Your First Web Page (Unit 5 — Make a Website): you'll start a brand-new unit and build your very first web page — the beginning of making things for the web.