
Session 10 — Polish Your Project
Duration: 75 min · Format: live online
What you'll learn: by the end, you can run a refine loop on your project, make concrete improvements to your two weakest rubric rows, and re-score to prove the work got better.
Soft skill focus — Resilience
Today you'll also grow Resilience — the refine loop only works if a rough first version doesn't discourage you. Every weak spot is the next thing to fix, not a verdict on you.
Try this: when a user test exposes a confusing part of your project, treat it as useful data, not criticism. Note it calmly and improve one thing.
Think about: what went wrong today that actually made your project stronger?
What you'll need
- The refine-loop diagram below — you'll walk through it in a moment.
- Last session's rubric self-score (the two weak rows you circled).
- If you can, a chart with a title and labels next to a messy one without them, so you can see the difference.
Hook
Think about these for a moment:
- Was your project's first version rough? Was anyone's perfect on the first try? (Almost nobody's — that's the point.)
- What's the difference between an okay project and a winning one?
Here's the reveal: it's almost never talent — it's how many times the builder tested and improved the project. Today you run that loop on your own work.
Teach — Polishing is a loop
Great projects aren't built once — they're refined again and again.
Here's the diagram:
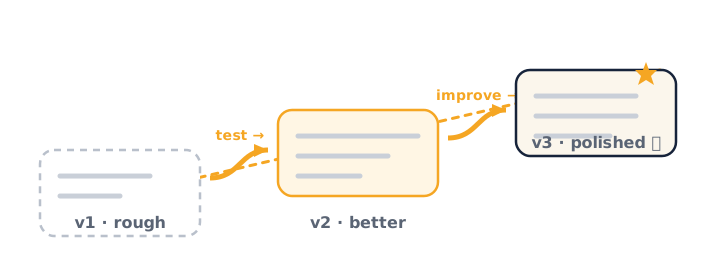
Walk through the loop:
- Test your project (or show it to someone).
- Find the weakest spot.
- Improve just that one thing.
- Repeat. Each loop makes it noticeably better.
⚠ Watch for polishing the wrong thing: it's tempting to keep improving the part that's already good, because it feels rewarding. But the loop only helps if each pass attacks your current weakest spot, not a favourite feature.
Ask yourself: what's one thing you already know is the weakest part of your project? How would you test it to be sure?
Teach — Fix the lowest score first
Don't polish what's already great — attack your lowest-scoring rubric rows for the biggest jump. Here are concrete moves per row:
- Low on results? Add more data or a clearer chart.
- Low on method? Repeat the test and write the steps precisely.
- Low on presentation? Clean up labels, tidy the code, rehearse the demo.
The key idea: judges notice details — a chart with a title and labels, a demo that doesn't crash, a tidy report. Small fixes add up to big scores.
Picture this: two projects have identical results. One has a titled, labelled chart; the other has a bare screenshot. Which scores higher, and why? The labelled one — it's easier to trust and understand, so it wins the presentation row.
Activity — Polish pass + user test
Now you work on your own project.
Part 1 — Polish pass (≈20 min).
- Open your rubric self-score from Session 9.
- Take your two weakest rows and make one concrete improvement to each.
- Re-test and re-score. Did the numbers go up?
- Do a "first impressions" check: does it look finished at a glance? Fix anything messy.
As you go, keep a clear before and after — what exactly did you change, and did the score move?
Part 2 — User test (≈10 min).
Pair up. Let a partner try your project with no help while you watch silently. Write down 2 improvements based on where your partner got confused.
Afterward, ask yourself: what surprised you when someone else used your project? Watching a real user reveals problems you can't see yourself.
Check yourself
See if you can answer these:
- What is the refine loop? → Test → find the weak spot → improve → repeat.
- Which part should you polish first? → Your lowest-scoring rubric row — that's where you gain the most.
- Name one small detail judges notice. → A chart title/labels, a demo that works, tidy code, or a clean report (any one).
Wrap-up
- Name the single improvement that moved your score the most today.
- Try this at home: run the refine loop one more time on your project before next session, and write one sentence on what you improved and why. Next session you write it all up.
Tips & extra challenges
- Watch out: "Polish means making the good parts even better" — not quite. Attack the weakest spot each loop.
- Want more? Try this — run a "reproducibility pass": make your result something a stranger could rebuild from your notes alone. (1) Hand your method notes to a partner and have them try to follow them — every spot they have to ask a question is a gap to fix. (2) Repeat the experiment (or re-run the model) at least once more to grow the sample and check the result is stable, not a fluke. (3) Label everything — chart titles and axes, data columns, code comments, file names. (4) Report uncertainty honestly — a range or "it worked 8 of 10 times," not a single tidy number. (5) Package a backup of everything (report, visuals, code, raw data) so a crash before the showcase costs nothing. The goal: a folder a stranger could open and reproduce your work from.
Vocabulary
| Term | Meaning |
|---|---|
| Refine | Improve through many small fixes |
| Iterate | Test → tweak → test again |
| User testing | Watching someone else try it |
| Polish | The finishing touches |
| First impression | How it looks at a glance |
Resources
- Canva / Google Slides — make visuals clean and pro.
- Google Sheets — turn results into clear charts (with titles!).
- Tinkercad / Colab — refine a build or model.
Practice set
Practise on your own — each of these reinforces the refine loop, targeting your weakest row, and reading a real user test. Model answers follow the arrow.
- Pick the target. A self-score reads: Idea 5, Method 4, Results 2, Presentation 3. Which one improvement gives the biggest jump, and name a concrete move. → Results (the 2) — add more data points or a clear, titled chart so the evidence backs the claim. Attack the lowest row first; a 5 can't rise.
- Fix the chart. A student shows a bare screenshot of numbers with no title or axis labels. Give one concrete instruction. → "Add a title that says what it shows, label both axes with what and the units." A titled, labelled chart wins the presentation row over a raw screenshot with identical data.
- Read the user test. During a silent user test, the partner clicked the wrong button twice and gave up before finishing. What does this tell the builder? → The starting step isn't obvious — the interface (or instructions) needs a clearer first action. Watching a real user reveals what the builder is too close to see.
- Catch the wrong loop. A student spends the whole polish pass making their already-strong intro animation smoother. Redirect them. → "That row already scores high — move to your lowest row." The loop only helps when each pass attacks the current weakest spot, not a favourite feature.
- Prove it improved. How does a student show their polish pass actually worked, rather than just claim it? → Re-test and re-score — a before/after on the same rubric row. If the number moved up (and they can name the exact change), the improvement is real.
- Method too vague. A method section reads: "I tested the sensor and it worked." Rewrite it so it scores on the method row. → State exactly what was done: "I placed the sensor 10 cm from the object, took 5 readings, and averaged them; repeated at 20 cm and 30 cm." Precise, repeatable steps score; a summary sentence does not.
Going deeper (optional)
Optional — for classes ready to go further.
The silent user test, and why silence matters. It's worth understanding why you stay silent while a partner tries your project. The instant you say "oh, you just click there," the test is ruined — in a real competition or product, no one is standing beside the judge to explain. The confusion your user hits is the finding. Write down the exact moment someone hesitates, backtracks, or asks "what now?" — those moments are worth more than any compliment, because each one is a concrete fix to a rubric row. A good habit: don't let yourself talk until your partner either finishes or fully gives up.
Diminishing returns — knowing when to stop polishing. The refine loop is powerful, but it doesn't run forever. Your first loop on a weak row buys a huge gain (a 2 to a 4), while the tenth loop on an already-strong row buys almost nothing. Professionals decide in advance how good is good enough for the deadline, then stop. For each row, name what a "good enough for the showcase" version looks like — so you polish to a target instead of fiddling endlessly with one part while another stays broken.
Common mistakes & fixes
If it's not working, check these:
- Mistake: Polishing the part that's already good because it feels rewarding. → Fix: Each loop must attack the current weakest row; the strong parts can't gain more.
- Mistake: Claiming "I improved it" with no before/after evidence. → Fix: Re-score on the same rubric row and name the exact change — show the number moved.
- Mistake: Talking the user through the project during a user test. → Fix: Watch in silence; the confusion is the finding, and in a real panel no one is there to explain.
- Mistake: Presenting results in a bare screenshot with no title or labels. → Fix: Add a title and labelled axes — judges trust and reward a chart they can read at a glance.
- Mistake: Endlessly polishing one favourite feature while another row stays broken. → Fix: Set a "good enough for the deadline" target per row and stop there; spread the effort across the weak rows.
What's next
Session 11 — Write It Up & Peer Review: you'll write your project report like a real paper, then trade honest feedback in a structured peer-review round.